A simple workflow using a central Git repository and Visual Studio
Git is a great version control system and is very easy to integrate with Visual Studio. Here's the workflow I use for projects using a centralised Git repository.
Surely you mean distributed?
Git is a distributed version control system (DVCS) but if you are used to a centralised workflow, maybe having used Subversion, then you can still do this with Git. This can also be a good way to transition to Git. After all, no-one likes change.
Creating the centralised repository
Typically you will want your central repository on a server for everyone to access. For a centralised repository to work, a bare repository must be created.
git init --bare \\server\path\repo.git
Notice the repository name has a .git extension. This is a common convention to denote a bare repository but by no means a requirement.
Existing Git repository
If you already have a Git repository, maybe you have been working on a project and now want to create a centralised repository, you can clone it as a bare repository.
git clone --bare <oldrepo> <newrepo>
That's all we need to do to set up our centralised repository.
Clone me baby
Now we want a branch of the repository on our machine so that we can work on a new feature. We do this using clone, the equivalent of checkout in Subversion.
git clone \\server\path\repo.git
It is important to understand what is happening here. When we clone we get a complete copy of the repository including version history. This is our master branch. Git then creates a copy of this for us to work with. This means we check changes into the master branch thus not effecting the central repository.
Git with Visual Studio
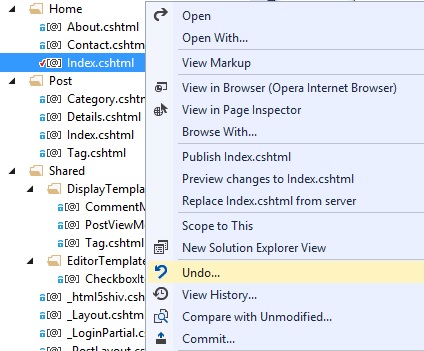
We now have the project to work with in Visual Studio. By installing Visual studio tools for Git, we can manage our changes from team explorer.

File status is shown in Solution Explorer and from the context menu we can perform tasks such as Undo, Compare, Commit, View History.
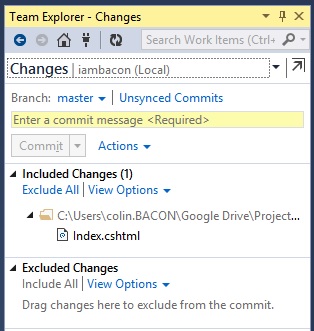
Committing our changes
If we look at the Commits Page in Team Explorer we can see the changes that we have made. Remember, when we commit it is to our master branch that we cloned from our central repository. This means we can happily commit or perform other functions without effecting the central repository.
Pushing to the central repository
Once you have finished the feature you are working on, you will want to commit your local changes back into the central repository. We can perform this from the command line. Remember we must have committed our changes to our master branch in Visual Studio first.
It's first worth checking if there are any changes to the repository that you do not have locally:
git pull
Essentially this runs a git fetch to pull down any changes and then runs a git merge to merge the changes.
Now we can push our commits to the central repository.
git push origin master
Origin is an alias that Git creates when you clone the repository and represents the path to your central repository.
Master is your local branch that you checked your changes into.
Once that has run, we have successfully committed to the central repository.
Summary
This article shows that it is very simple to set up a simple workflow using Git with a central repository located on a server to be shared with multiple developers. We can see it is possible to start using Git without it feeling too alien by sticking with an existing workflow that we may have used with Subversion. Once you get familiar with Git you can then look at a distributed workflow.